Iedere dag bieden wij GRATIS software met licentie waarvoor je normaliter moet betalen!

Giveaway of the day — BLACK & WHITE projects 4 (Win&Mac)
BLACK & WHITE projects 4 (Win&Mac) werd aangeboden als een giveaway op 12 augustus 2020
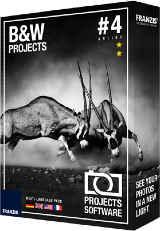
ZWART & WIT projecten 4 is het perfecte gereedschap om alle fotografen met een bijzondere affiniteit voor zwart-wit foto ' s te maken van hun creatieve mark. De nieuwe spectrale gevoeligheid van de motor kunt u pak de grijze waarde in voor elke geconverteerde kleur en pas het aan iedere toon waarde. De 115 handgemaakte voorinstellingen bieden u een overvloed aan opties van je foto' verborgen informatie. Geef uw foto een 100% analoge afwerking met high-res film emulaties aangepast van klassiekers zoals Ilford, Kodak, Rollei en Fuji.
The current text is the result of machine translation. You can help us improve it.
Systeemvereisten:
Min. System Requirements: Windows 10/ 8 / 7 (32 Bit), Prozessor Core Duo, 2 GB HDD, 2 GB HDD, 1.280 x 1024 Pixels Screen Resolution, Graphic: DirectX-8-compatible, 128 MB, 32 bit colour depth; Mac OS X ab 10.7, 64 Bit, Prozessor Intel/G5, 2 GB HDD, 2 GB HDD, 1.280 x 1024 Pixels Screen Resolution. The plug-in functionality is currently not supported by macOS 10.15 (Catalina)!
Uitgever:
FRANZIS Verlag GmbHWebsite:
https://www.projects-software.com/black-white/bw4-bupBestandsgrootte:
293 MB
Licence details:
Lifetime
Prijs:
$99.00
GIVEAWAY download basket
Reactie op BLACK & WHITE projects 4 (Win&Mac)
Please add a comment explaining the reason behind your vote.
I'm a huge fan of B+W Projects (although I'm using 6 Pro currently) but it can take a bit of getting your brain around when you start. There are other ways of doing B+W conversions, but IMHO never just change the image to grey-scale and think you're done.
Oh and if you haven't registered any of the Franzis products before it does involve a certain amount of jumping through hoops the first time :-)
Anyway I wrote this guide a while back and I'll post it here (tweaked again, one day this won't take me 30+minutes at 32.3C) in the hope it will be of use to people...
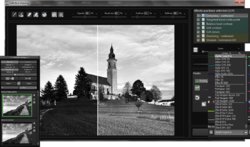
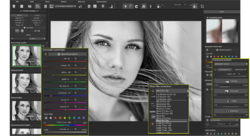
Load a picture, play with the canned effects on the left side, play with the Film Type on the right side panel (which should start on the “Finalise” tab). At the top of that panel you can choose a colour filter to apply to the original (assuming it's a colour image, the same as putting a filter on the lens and using B+W film), either as a preset or use the sliders (the presets just move the sliders, e.g. Yellow -> 60/120). At the bottom of the panel you can select toning options (which would be a printing technique back in the day), which is the same theory of having a collection of presets which set sliders.
Changing to "Expert" in the right panel you can add filters from the list at the top, select them in the middle of the panel and tweak their effects at the bottom (may need scrolling down). (I'd ignore that until you are comfortable using it.)
The boxes at the top of the left panel filter the effects that are listed in the panel, so ignore them initially (although using the favourites stars to select presets you like and then filtering on them is handy). On a faster computer you can use the Eye icon on the toolbar to disable the preview mode and show the final image in the main window, which IMHO is worth doing.
When saving the final image note that the first dialog, where it asks for the title, is going to write that over the image, it isn't the file name. That is the point you do cropping though.
The main disadvantage is the lack of full Undo operations.
Note that although they do add a Photoshop plugin it's under File->Export, not Filters, which IMHO doesn’t really count. You need a later version to get what I'd call a "real" Photoshop filter.
The thing to get your brain around is it a huge pile of image processing tools, which are gathered together into presets in the left pane. All those options do is select a bunch of processing tools and choose options for them, so they are infinitely tweakable in the Expert tab of the right pane once you're up to speed (and if you want to). IMHO there is no need to tweak anything in Expert 99% of the time. (Although stuff like modifying a vignette can be handy sometimes.)
BTW I bought a copy of BWP retail some time ago, but when they had a discount price - which they do quite often, so I'd say rather than paying the full price for Franzis' stuff sign-up for the newsletter and see if a deal appears. Basically 99% of the B+W images I post online came out of B+W Projects.
I suspect they haven't updated the installer and so only have an old version of the Raw file reader (for Raw files saved by digital cameras). To add raw support for somewhat more recent cameras download this (if you're running 64-bit Windows):
http://transfer.franzis.de/projects/RawImageDllprojects_Win64.zip
and replace C:\Program Files\Franzis\BLACK WHITE projects 4\FreeImage.dll with the dll file it contains (if it is newer).
If you're not running the 64-bit version of Windows, i.e. your computer doesn't have a directory "C:\Program Files (x86)" then the file you want for upgraded raw support in 32-bit Windows is: http://transfer.franzis.de/projects/RawImageDll_projects_Win32.zip
If you have a Mac you'll need to get the OSX version of FreeImage from SourceForge and replace the existing one, wherever it might be.
After exploring this - Franzis Black and White Projects 4 - especially free today, I see that it has an unimaginable and perhaps unmanageable plethora of controls, from pre-processing raw conversion controls, even for non-raw images, to an overwhelming variety of post-processing controls ... I would need ~700 pages in a notebook to catalog the possibilities of what I might control in this, especially if I ever wanted to apply the same iterative interactive suite of controls twice, let alone with any precision.
This looks like a fantastic program with phenomenally powerful calculating controls, but a program that I will never use, because I cannot imagine finding and controlling the controls.
Thanks for hinting at the mathematical possibilities of what someone can do to a digital image.
Now to create a user interface that is intuitive, accessible, unambiguous, predictable, and has enough contrast to read without squinting and getting my eye up to my screen with a magnifying glass to figure out what the controls are saying in low-contrast black-on-gray ...
I have dozens of Franzis programs, and I have never used them more than for the original day of test, and I have never produced an output presentation image with any Franzis program, reverting to free IrfanView, free Google Picasa, free Adobe Photoshop ( yeah, CS2 free lifetime licenses on the web direct from Adobe ).
Sorry, Franzis, but your programs are like dumping a super mechanic's toolbox of hundreds of customized specialist tools on the floor in front of me when all I wanted was a simple screwdriver, pliers, and a hammer ( which together, in the right hands, can accomplish almost anything that more sophisticated dedicated powerful precision tools offer ).
The user interface is actually the hardest part of programming.
Apparently.
.
Once again @Franzis... did anybody ever try to use the Mac Version?
The answer is NO - because again the rights for the unpacker is NOT executeable and needs to be fixed manually.
The download is a zip file -> extract it to folder go to Contents/MacOS and check for the unpacke file.
In the Terminal application issue a chmod 337 unpacker
This is the version in the file:
384 -rw-rw-rw- 1 xxx staff 194332 16 Okt 2015 Unpacker
>chmod 337 Unpacker
This is the correct version:
384 --wx-wxrwx 1 xxxxx staff 194332 16 Okt 2015 Unpacker
Not fixed since 2015
After this change you can install the programm
What would be the advantages of this product vs Photoshop CC's B&W layer tool?
Thanks.
AR, I don't use Photoshop. This is simple and costs a whole lot less than anything Adobe produces.
AR, I have no idea. There are other software available which can offer this B&W conversion and more. For instance, to purchase, Luminar 4 is cheaper and has far more effects bundled in.
An alternative is to use a setting on your camera/phone to B&W.


Vraagt steeds om serienummer. Nooit ontvangen. Blijft op aftellende try periode.
Save | Cancel